Did you know doodlebats can be easily cut with your electronic cutter? Since they install and work just like a font, using our
doodlebats are a fun, easy and SUPER CHEAP option for your paper cut creations. Especially during our
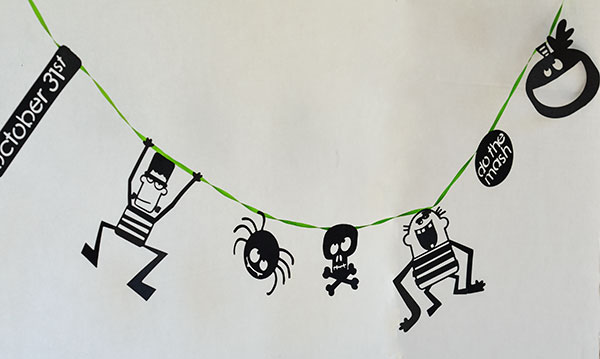
50 cent sale! I created this cute Halloween garland using
DB Frank's Friends.
Directions:
Install your doodlebat like you would install any font. And open your cutting software. I use
Make-the-Cut. Type what you want in your text box, sometimes with the doodlebats I just type every letter.
Your images should show up on your virtual mat. I then split the images after. In
MTC, you right click>shape magic>split. The images will then split apart so you can work with them individually. Some images may need minor adjustments for ideal cutting, but others will be able to cut as is! I wanted to use the phrase do the mash, but I obviously you can't use the stitch marks, so just pull the circle out and then I resized larger.
The other thing you will have to do when you use wording is stencil the letters. I did this by creating small rectangles using the shape tool at the top.
Resize the rectangle to the size you want it and place over the letters that will need stenciled.
Then you will need to weld the rectangles to the original shape. Right click>shape magic>weld.
Other images in this set worked pretty well, I just had to move some eyes and mouths so that they were touching edges, which can be done by following the same process as above. I then glued all my pieces to a ribbon for an easy, cute garland!
For my card I used the
DB Lil' Pumpkins. I brought it into
MTC the same way I did with the Frank's Friends Doodlebat above using the type tool. I resized the image and I copied and pasted a second image.
Select the left image and right click>shape magic>black out.
Now we want to get rid of the stem. You need to go into node mode to do this by clicking view>node mode. Now use the 2nd tool called the edit paths tool. Right click on a node and delete it. Continue doing this until the stem is gone. You will then need to join the empty paths. Using the 4th tool down you can draw a straight line through the empty paths. Right click to release.
Now you will need to weld the front and the back of the card. Right click>shape magic> weld.
Now your card is mostly done. You may want to add another score mark in the center so it's easier to fold. You do this by going back into node mode and using the straight line tool again.
Now to make the interior of the card, just right click>shape magic>shadow layer. I selected -.5 mm.
Last, black it out by right clicking>shape magic>black out. Again you can now add a score mark through the middle. Cut your layers and glue together.


No comments:
Post a Comment